
Л298Н Motor Driver Datasheet | H Bridge Arduino
- Конфигурация вывода: Half Bridge (4)
- Приложения: DC Motors, Relays, Solenoids, Stepper Motors
- Интерфейс: Логика
- Упаковка: Multiwatt-15 (Vertical, Bent and Staggered Leads)


БЕСПЛАТНАЯ доставка для заказов свыше HK$250.00

Быстрый ответ, быстрая расценка

Быстрая отправка, никаких проблем после продажи

Оригинальный канал, гарантия подлинности продукции
Л298Н
The L298N is a handy motor driver you’ll often find useful, especially if you’re into building robots or automation projects. You can easily use it to control two DC motors simultaneously, or even a single bipolar stepper motor. One great thing about this driver is its broad voltage range—you can run it anywhere from 4.5 volts up to 46 volts, which covers most hobbyist needs.
Each channel comfortably provides up to 2A of continuous current, peaking at 3A, so you’ve got plenty of power for slightly bigger motors. What’s really nice about the L298N is the built-in protection against overheating and short-circuits—it saves you from damaging your setup. Plus, it’s friendly with both TTL and CMOS logic, making it super easy to hook up to microcontrollers like Arduino or Raspberry Pi.
With PWM support, you also get precise control over your motor speed and direction, which is perfect for detailed projects.
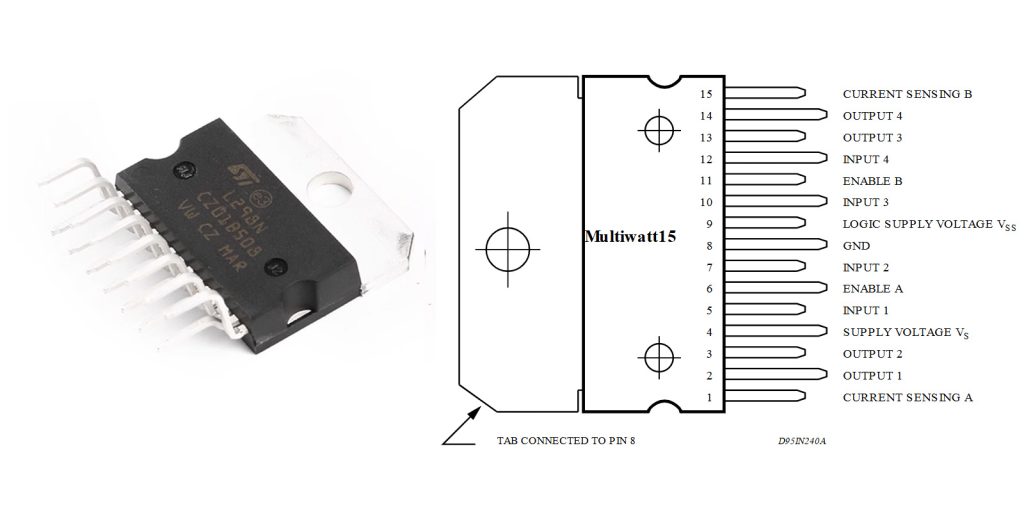
L298N Pinout

Here’s the pinout for the L298N motor driver IC presented clearly in a table:
| Номер контакта | Имя пин-кода | Description/Function |
|---|---|---|
| 1 | Current Sense A | Channel A Current Sensing |
| 2 | Output 1 | Channel A Output (Motor Terminal) |
| 3 | Output 2 | Channel A Output (Motor Terminal) |
| 4 | Vs | Motor Supply Voltage (4.5 to 46V) |
| 5 | Input 1 | Logic Input for Output 1 |
| 6 | Enable A | Enable Pin for Channel A (PWM Speed Control) |
| 7 | Input 2 | Logic Input for Output 2 |
| 8 | Земля | Земля |
| 9 | Vss | Logic Power Supply Voltage (+5V typical) |
| 10 | Input 3 | Logic Input for Output 3 |
| 11 | Enable B | Enable Pin for Channel B (PWM Speed Control) |
| 12 | Input 4 | Logic Input for Output 4 |
| 13 | Output 3 | Channel B Output (Motor Terminal) |
| 14 | Output 4 | Channel B Output (Motor Terminal) |
| 15 | Current Sense B | Channel B Current Sensing |
Pinout Usage and Precautions:
When you’re setting up the L298N motor driver, make sure your motor power supply (Vs) stays within the recommended voltage range, from 4.5V to 46V. Typically, the logic power supply (Vss) works best around 5V for stable performance. If you need precise control over your motor speeds, use the Enable pins (Enable A/B) with PWM signals—this gives you much better control.
Always remember to properly ground your setup and be careful to avoid short circuits at the outputs, because that can seriously damage your IC. Also, keep an eye on your current usage; if you’re pushing the driver close to its maximum limits, make sure you’re using a heat sink or another cooling method. That way, you’ll prevent overheating and extend the life of your chip.
L298N Equivalent


L298N Equivalent Pinout
Here’s a table comparing L298N with equivalent motor driver ICs in the same or similar packaging:
| Parameter | Л298Н | Л293Д | SN754410 | VNH2SP30 |
|---|---|---|---|---|
| Supply Voltage (Vs) | 4.5–46 V | 4.5–36 V | 4.5–36 V | 5.5–16 V |
| Continuous Current | 2 A per channel | 0.6 A per channel | 1 A per channel | 14 A (peak 30 A) |
| Peak Current | 3 А | 1.2 A | 2 А | 30 A (short bursts) |
| Тип упаковки | Multiwatt-15, PowerSO20 | ДИП-16, СОИК-16 | ДИП-16, СОИК-16 | MultiPowerSO-30 |
| Thermal Protection | Да | Да | Да | Да |
| Internal Diodes | No (External diodes required) | Да | Да | Integrated MOSFET (no diodes required) |
| Logic Input Voltage | TTL, CMOS (5V compatible) | TTL, CMOS (5V compatible) | TTL, CMOS (5V compatible) | CMOS (3.3V or 5V compatible) |
When looking for a replacement for your L298N motor driver, always pick something that meets your specific voltage and current needs. Options like the L293D or SN754410 might seem similar, but keep in mind they handle lower currents and narrower voltage ranges. If you’re running powerful motors, consider something like the VNH2SP30—it offers higher current capability, built-in MOSFETs, and you won’t need external diodes. Most importantly, always check that your replacement is compatible with your existing logic setup and can handle heat well. This ensures your motors run smoothly and safely, avoiding overheating issues.
l298n motor driver Arduino & l298n wiring diagram


Here’s how to easily connect and use your L298N motor driver with an Arduino Mega:
Power everything with a 5V USB power bank. Connect it to your Arduino Mega’s USB port, and also supply 5V to the L298N’s 12V input (though normally you’d choose higher voltage to ensure your motors run smoothly with enough power).
Your two DC motors hook up to the L298N’s outputs (OUT1–OUT4) for independent control. Connect Arduino pins (like 2–5 and 8–11) to the L298N inputs and enable pins (IN1–IN4, ENA, ENB). PWM signals let you adjust each motor’s speed and direction. Ensure both grounds (Arduino and L298N) are connected together for stability.
l298n dual h bridge
L298N Dual H-Bridge Overview:
If you’re building projects with motors, the L298N motor driver is super handy. It lets you easily control two DC motors at once or even a stepper motor. One reason you’ll find it useful is how durable it is—it can handle a lot of use without issues. Plus, hooking it up to microcontrollers like Arduino or Raspberry Pi is straightforward, making your life much easier when setting up your robotics or automation projects.
Принцип работы:
Using an H-bridge setup is a simple and effective way to control your DC motor in both directions. Basically, by switching the voltage polarity on the motor terminals, you can make the motor spin forward, backward, or stop completely. And if you use PWM signals on the enable pins, you’ll have precise control over the speed, letting you fine-tune how fast your motor runs for your projects.
l298n vs l293d

Here’s a detailed comparison of the Л298Н и Л293Д motor driver ICs, highlighting the important parameters:
| Parameter | Л298Н | Л293Д |
|---|---|---|
| Supply Voltage (Vs) | 4.5V to 46V | 4.5V to 36V |
| Output Current (Continuous) | 2A per channel | 0.6A per channel |
| Peak Current | 3A per channel | 1.2A per channel |
| Рабочая температура | -25°C to 130°C | -40°C to 85°C |
| Тип упаковки | Multiwatt-15, PowerSO20 | ДИП-16, СОИК-16 |
| Logic Input Voltage | TTL, CMOS compatible | TTL, CMOS compatible |
| Thermal Protection | Yes (Thermal shutdown) | Yes (Thermal shutdown) |
| Internal Diodes | No (External diodes needed) | Yes (Internal diodes for flyback) |
| PWM Control | Yes (For motor speed control) | Yes (For motor speed control) |
| Расходы | Typically higher | Typically lower |
| Use Case | Higher current applications | Low to medium current applications |
Summary and Precautions for Replacement:
If you’re working on a higher power project, the L298N is your go-to driver. It handles higher voltages (up to 46V) and can handle more current (2A per channel, 3A peak), which makes it perfect for larger motors that need more power and torque. Just keep in mind that it doesn’t come with internal diodes for flyback protection, so you’ll need to add external diodes for motor protection.
On the other hand, the L293D is better suited for smaller motors or lighter loads. It supports lower voltages (up to 36V) and lower current (0.6A per channel). Plus, it has internal diodes for flyback protection, which means you don’t have to worry about adding extra components for motor safety.
When switching between these two, make sure the voltage and current match your needs. If you’re using higher-power motors, go with the L298N. For smaller, low-power projects, the L293D can save you some money.
How to connect l298n to raspberry pi
To get your L298N motor driver working with a Raspberry Pi, just follow these easy steps:
-
Power Supply:
• Connect the 12V+ (Vs) pin of the L298N to an external power supply.
• Make sure to connect the GND of the L298N to the GND of both the Raspberry Pi and the external power supply. -
Motor Connections:
• Hook up OUT1 and OUT2 to the terminals of Motor 1.
• Connect OUT3 and OUT4 to Motor 2. -
GPIO Connections:
• Connect IN1 and IN2 for Motor 1 to Raspberry Pi’s GPIO pins (like GPIO17 and GPIO27).
• For Motor 2, connect IN3 and IN4 to GPIO pins (for example, GPIO22 and GPIO23).
• Plug ENA and ENB into 5V for constant power, or use GPIO pins for PWM speed control. -
Control Motor Directions:
Use the Python GPIO library with commands like GPIO.output(IN1, GPIO.HIGH) to set the motor’s direction (forward or backward).
l298n stepper motor control
The L298N motor driver is commonly used for controlling stepper motors, especially in robotics and automation projects. Here’s a simple explanation of how it works:
-
Motor Connections: A stepper motor usually has four wires that you’ll connect to the L298N’s output terminals (OUT1, OUT2, OUT3, OUT4). These connections control the rotation of the stepper motor.
-
Control Signals: The L298N has two input pins (IN1, IN2, IN3, IN4) for each of the motor coils. By sending different combinations of HIGH and LOW signals to these pins, you can control the motor’s direction and steps, making it move precisely.
-
PWM for Speed Control: The L298N also has Enable pins (ENA, ENB) that let you use PWM signals to control how fast the motor turns. By adjusting the PWM signal’s duty cycle, you can control the motor’s speed.
-
Power Supply: You’ll need an external power supply for the stepper motor (usually 12V), while the L298N logic side works on 5V, which can be powered by an Arduino or other microcontroller.
How l298n works
The L298N is basically a dual H-Bridge motor driver, and it’s pretty useful when you want to control motors, especially DC motors or steppers. Think of it as having two separate H-bridge circuits inside, and each one can drive a single motor. Usually, you’d connect it to a microcontroller like an Arduino, and then use signals from there to set both the speed (using PWM) and direction (by changing the input signals on the H-bridges). It also has its own power and ground pins specifically for the motors, so your motors get enough juice without stressing your microcontroller. You’ll see this chip pop up a lot in DIY robotics or automation projects because it makes handling motors super straightforward.
Больше похожего

74ALVC245PW
Нексерия

74AHCT245PW
Нексерия

SN54LS245J
Техасские инструменты
74AVC8T245PW
Нексерия

74LVC245AD
Нексерия
74ALVC164245DL
Нексерия

74LVC4245AD
Нексерия
74LVC16245ADGG
Нексерия
74ALVC164245DGG
Нексерия

GTL2014PW
NXP Полупроводники
74HCT245PW
Нексерия
74LVC245APW
Нексерия
Также добавить в корзину

FT601Q-B-T
FTDI, Future Technology Devices International Ltd

RT7299BHGQW
Richtek USA Inc.

RS624XTDB14
Технология RUNIC в Цзянсу
PIC12F1501-E/SN
Технология микрочипов
TDA7379
STMicroelectronics

PIC16F73-I/SO
Технология микрочипов

KSZ9031RNXCA-TR
Технология микрочипов

SY7310AADC
Силерджи Корпорейшн

CD4093BE
Корпорация Харрис

REF3318AIDBZR
Техасские инструменты

CH395Q
ЧМ(Цзянсу Цинь Хэн)

XC6SLX75-2FGG484C
AMD Xilinx
Сопутствующие товары
74ALVC245PW
Нексерия
74AHCT245PW
Нексерия
SN54LS245J
Техасские инструменты
74AVC8T245PW
Нексерия
74LVC245AD
Нексерия
74ALVC164245DL
Нексерия
74LVC4245AD
Нексерия
74LVC16245ADGG
Нексерия
74ALVC164245DGG
Нексерия
GTL2014PW
NXP Полупроводники
74HCT245PW
Нексерия
74LVC245APW
Нексерия

74LVC4245APW
Нексерия
74HC245PW
Нексерия
74LVC162245ADGG
Нексерия
74LVCH162245ADGG
Нексерия

HC55185AIM96
Ренесас / Интерсил

DS26521LN
Аналоговые устройства / Maxim Integrated

XRT91L31IQ-F
МаксЛинейный

PEF22554HTV2.1
Технологии Инфинеон
PEF2256HV2X S LL76
МаксЛинейный
PEB4266TV1.2
Технологии Инфинеон
PM4354-NGI
Технология микрочипов
PEF22554HTV31 S LL6Z
МаксЛинейный
PEF 24624 E V2.2
Технологии Инфинеон
PEF22628EV1X
МаксЛинейный
PEF24628EV1X
МаксЛинейный

SA5212AD
NXP Полупроводники

SSM2164SZ
Аналоговые Устройства

LTC6910-2CTS8
Аналоговые Устройства
Пожалуйста, отправьте запрос предложения, мы ответим немедленно.
