
OPA2134PA datasheet, pinout & review
- Amplifier Type: Audio
- Number of Circuits: 2
- Output Type: -
- Package: 8-DIP (0.300, 7.62mm)


FREE delivery for orders over HK$250.00

Quick response, quick quotaton

Flash shipment,no worries after sales

Original channel,guarantee of the authentic products
More Re branded OPA2134PA Op Amps Exposed!!!
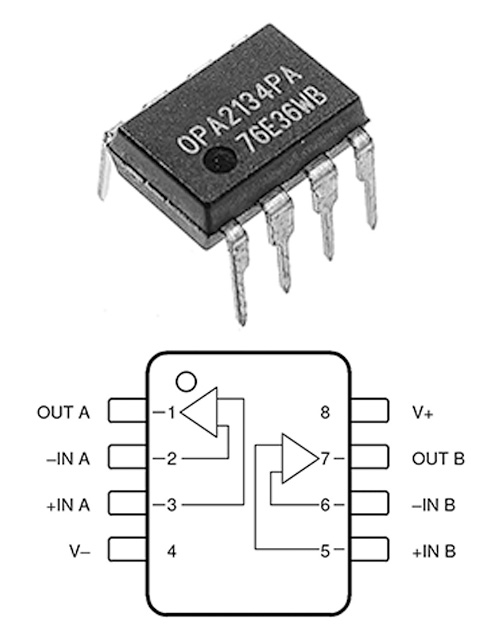
OPA2134PA
If you’re working with audio equipment or building high-quality audio gear, the OPA2134PA operational amplifier (op-amp) is a fantastic choice. Let me share why:
First off, it’s super quiet. You’ll hardly notice any background hiss because the noise level is extremely low—typically around 8 nV/√Hz at 1 kHz. This means cleaner, clearer sound without that annoying buzz or hum.
It also offers extremely low distortion—just around 0.00008% total harmonic distortion. In practical terms, that means your music stays pure and true to the original recording.
With an 8 MHz bandwidth and a fast slew rate of 20 V/µs, this op-amp handles dynamic audio signals like a pro. So, if your music suddenly jumps or spikes, the OPA2134PA keeps up smoothly without any issues.
Another handy feature is that it’s unity gain stable. You don’t need to worry about stability even at low gain settings—it works just fine from gains of 1 upwards.
Since it uses FET inputs, it has very high input impedance. That means it won’t load down your source equipment, ensuring maximum signal integrity. Plus, the input bias current is extremely low (around 5 picoamps), making it ideal for buffering sensitive audio signals.
The OPA2134PA also has impressively low offset voltage—typically just ±0.5 mV—helping your circuits maintain accuracy and consistency.
One great convenience is that it comes as a dual operational amplifier. That means you get two high-quality amplifiers in one easy-to-handle DIP-8 chip, perfect for through-hole PCB designs.
This chip can comfortably operate with a supply voltage from ±2.5 V all the way up to ±18 V, giving you lots of flexibility depending on your project’s power requirements.
It’s built for commercial temperatures (0°C to +70°C), so it fits right into most typical audio environments.
Because of its superior clarity and low distortion, the OPA2134PA is a favorite among audiophiles. You’ll often find it in high-end audio amplifiers, active filter circuits, equalizers, audio mixers, and professional-grade preamps. It’s also great for precision analog instrumentation where clean signals are a must.
If you’re serious about audio quality, this little chip could definitely help you level up your gear.
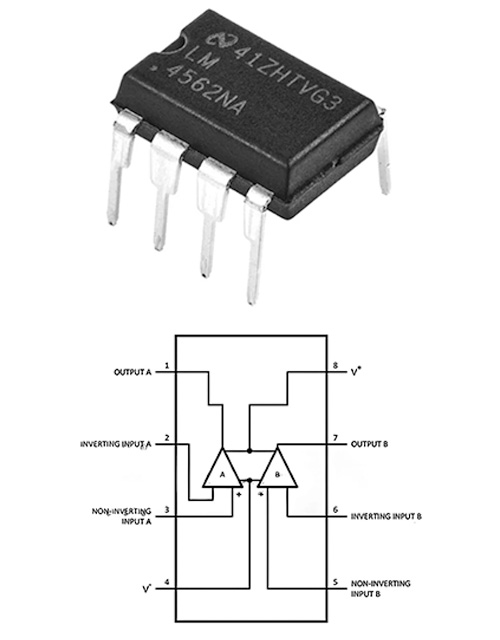
OPA2134PA pinout
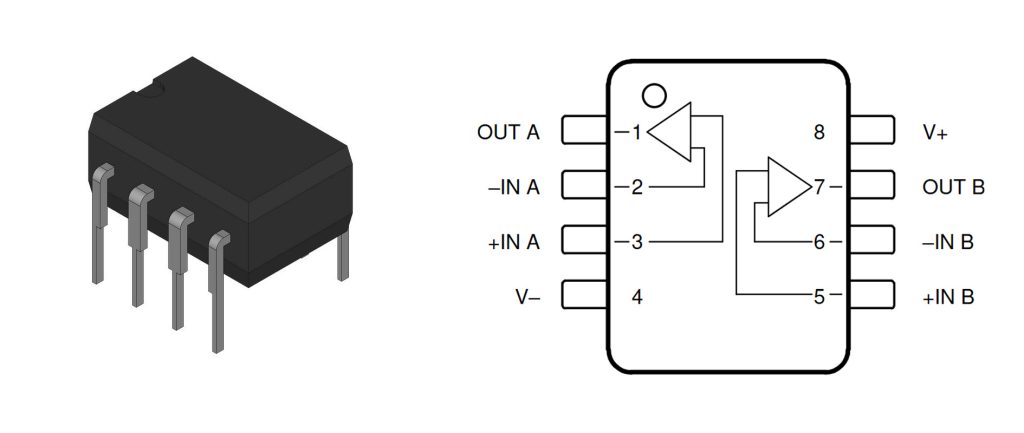
Here’s the pinout of the OPA2134PA operational amplifier presented clearly in table format:
| Pin Number | Pin Name | Function |
|---|---|---|
| 1 | OUTPUT A | Output of Amplifier A |
| 2 | -IN A | Inverting input of Amplifier A |
| 3 | +IN A | Non-inverting input of Amplifier A |
| 4 | V- | Negative power supply voltage |
| 5 | +IN B | Non-inverting input of Amplifier B |
| 6 | -IN B | Inverting input of Amplifier B |
| 7 | OUTPUT B | Output of Amplifier B |
| 8 | V+ | Positive power supply voltage |
When you’re working with the OPA2134PA chip, keep in mind that it’s actually two separate operational amplifiers packaged into one convenient 8-pin DIP. Amplifier A uses pins 1, 2, and 3 for output and inputs, while Amplifier B is hooked up to pins 5, 6, and 7. Pins 4 and 8 are your power pins, typically powered by symmetrical dual supplies ranging anywhere from ±2.5 V to ±18 V.
Here are a few practical tips to help you avoid issues:
- Power Supply Tips: Make sure you hook up your power supply correctly—negative voltage to pin 4 and positive voltage to pin 8. If you accidentally reverse polarity or supply voltage that’s too high, you’ll likely damage your chip.
- Input Handling: The input pins (2, 3, 5, and 6) are sensitive and designed with high impedance for low noise. Always handle them carefully and take precautions against static discharge (ESD). A quick zap from static electricity can easily ruin these sensitive inputs.
- Output Safety: Be careful not to short the outputs at pins 1 and 7 directly to your power rails or ground. Doing this can permanently fry your amplifier, which nobody wants.
- Cooling and Spacing: If you’re pushing the chip hard with higher voltages or heavy current loads, give it enough space for airflow and cooling. Keeping it cool helps prevent overheating, which can mess with your circuit’s performance or even damage your amplifier.
Follow these straightforward tips, and you’ll have fewer headaches and better results with your OPA2134PA projects.
OPA2134PA Equivalent
Here’s a clear, comparative table showing equivalents to OPA2134PA with the same DIP-8 package, highlighting essential parameters:

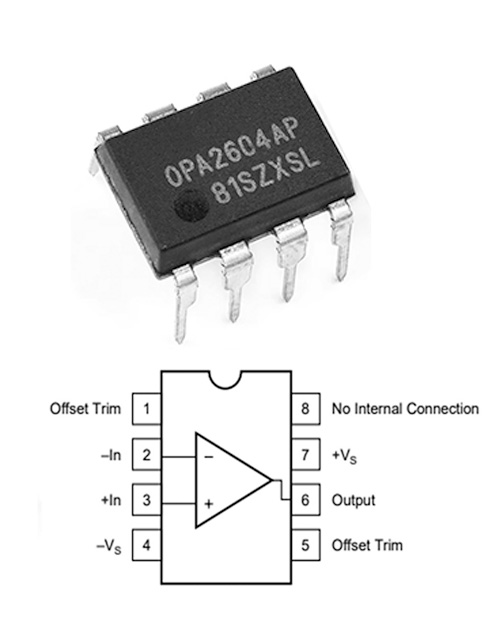
| Parameter | OPA2134PA | NE5532P | TL072CP | OPA2604AP | LM4562NA |
|---|---|---|---|---|---|
| Supply Voltage (±V) | ±2.5 to ±18 V | ±5 to ±15 V | ±3.5 to ±18 V | ±4.5 to ±24 V | ±2.5 to ±17 V |
| Gain Bandwidth (MHz) | 8 MHz | 10 MHz | 3 MHz | 20 MHz | 55 MHz |
| Slew Rate (V/µs) | 20 V/µs | 9 V/µs | 13 V/µs | 25 V/µs | 20 V/µs |
| Input Noise (nV/√Hz) | 8 nV/√Hz | 5 nV/√Hz | 18 nV/√Hz | 10 nV/√Hz | 2.7 nV/√Hz |
| THD (Typical) | 0.00008% | 0.0009% | 0.003% | 0.0003% | 0.00003% |
| Input Bias Current | 5 pA | 200 nA | 65 pA | 100 pA | 10 nA |
| Offset Voltage | ±0.5 mV | ±0.5 mV | ±3 mV | ±1 mV | ±0.1 mV |
| Operating Temperature | 0 to +70°C | 0 to +70°C | 0 to +70°C | -25 to +85°C | -40 to +85°C |
When you’re looking to replace an OPA2134PA with an equivalent part, here are a few key things to keep in mind:
- Power Supply Range: Make sure the new op-amp can handle the same voltage range as your current circuit. If the voltage isn’t compatible, you could damage your setup or run into operational issues.
- Bandwidth and Slew Rate: Try to pick an op-amp that offers at least the same bandwidth and slew rate as your original. This helps maintain clear sound quality and prevents distortion, especially if you’re working with audio or high-speed applications.
- Noise and Distortion: For audio equipment, always go for an op-amp with low noise and distortion. That way, you can keep your audio signals clean and maintain high sound quality.
- Input Bias Current and Offset Voltage: If you’re dealing with precision circuits, find an op-amp with lower input bias currents and offset voltages. This will help ensure your measurements or outputs stay accurate.
- Operating Temperature: Don’t overlook the operating temperature. Make sure your replacement can comfortably handle the temperatures it’ll be exposed to in your project.
Lastly, always double-check the official datasheets and thoroughly test any new parts in your actual circuit. This extra step helps avoid any unexpected issues and ensures everything runs smoothly.
OPA2134PA Audio Pre-amplifier Circuit

Circuit Overview:
- IC1A and IC1B: These two parts represent the dual amplifiers built into the OPA2134PA chip. Typically, you’d use this setup for a stereo system—one amplifier per audio channel.
Signal Path and Operation:
- Input Stage:
- Your audio signal comes in through the “IN” connector on the left side.
- There’s a capacitor (C1) right at the input to block out any DC voltage, making sure only your audio (AC) signal gets through.
- The resistor (R2) sets the input impedance, which helps stabilize your signal and keeps everything running smoothly.
- Amplification Stage (IC1A and IC1B):
- Here, the OPA2134PA is set up as a non-inverting amplifier. That just means your signal gets amplified without flipping its phase.
- The resistors (R6 and R4 for IC1A; R9 and R8 for IC1B) control how much amplification you get. Change their values if you want your audio louder or softer.
- Capacitors like C2 and C3 help eliminate any DC offset. This means no unwanted DC voltage can sneak through and harm your speakers or audio equipment.
- Output Stage:
- After amplifying, the audio signal exits through the pins labeled “OUT.” You’ll connect these outputs directly to your speakers or headphones, usually through some coupling capacitors (like PG20).
- The output capacitors protect your speakers by blocking DC current, allowing only the audio signal through.
- Power Supply:
- The OPA2134PA chip uses a dual power supply (±9V in this example). This type of power supply lets your audio signals move evenly above and below ground level, enhancing audio clarity and reducing distortion.
Key Points to Keep in Mind:
- Always place decoupling capacitors (usually around 0.1 µF ceramic capacitors) close to your IC’s power pins. This simple step greatly reduces noise and helps your circuit perform better.
- Good grounding practices are super important to avoid hum and noise. Make sure everything’s connected properly to a solid ground.
- Choose quality components like metal film resistors and film capacitors if you’re aiming for the best audio quality.
- You can tweak resistor values if you want a different gain or impedance, but always test your changes carefully to maintain stability.
Overall, this circuit provides an easy and effective way to achieve excellent audio quality using the OPA2134PA, offering clear sound and minimal distortion.
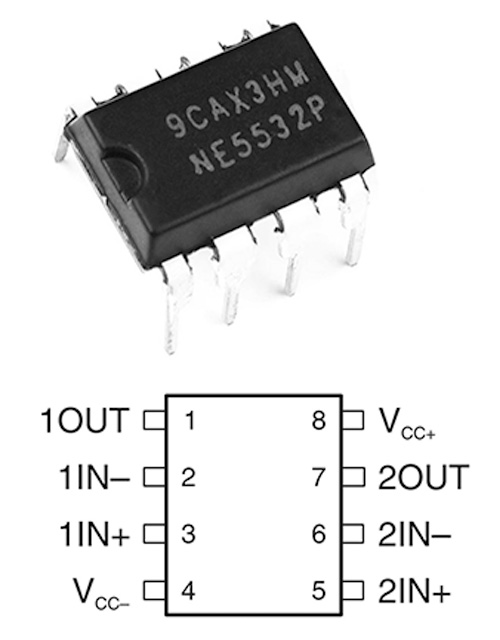
OPA2134PA Alternative to NE5532 Op-Amp
The OPA2134PA and NE5532 are two common dual op-amps you’ll often run into, especially when you’re working on audio gear. Let me quickly walk you through their specs and help you figure out which one might suit your needs best:


| Parameter | NE5532 | OPA2134PA | Remarks |
|---|---|---|---|
| Supply Voltage Range | ±3 V to ±20 V | ±2.5 V to ±18 V | NE5532 has a slightly wider voltage range. |
| Slew Rate | ~9 V/µs | 20 V/µs | OPA2134PA responds faster, ideal for high-frequency audio signals. |
| Gain Bandwidth Product | ~10 MHz | 8 MHz | NE5532 has slightly higher bandwidth. |
| Total Harmonic Distortion (THD) | Low but higher than OPA2134PA | Extremely low (0.00008%) | OPA2134PA provides superior audio fidelity. |
| Input Noise Density | ~5 nV/√Hz (typical) | 8 nV/√Hz | NE5532 slightly better noise figure, OPA2134PA still excellent. |
| Input Bias Current | 200 nA (typical) | 100 pA (typical) | OPA2134PA has significantly lower input bias current, suitable for sensitive applications. |
| Cost | Generally cheaper | More expensive | NE5532 usually offers better economy. |
Practical Analysis:
- Audio Quality:
- If you’re really into high-quality audio, you’ll appreciate the OPA2134PA. It offers extremely clear sound with very low distortion and quicker response times. It’s ideal if you’re building something like a hi-fi audio preamp, headphone amp, or professional audio equipment.
- The NE5532, on the other hand, is a classic option that’s reliable, affordable, and good enough for most applications. However, if audio quality is your top priority, many audio enthusiasts typically prefer the OPA2134PA.
- Noise Performance:
- Both these op-amps handle noise pretty well. But here’s a tip: if you’re working in environments that demand super clean audio—like professional recording studios—you might prefer the OPA2134PA because its lower input bias current helps maintain better signal clarity and overall sound purity.
- Power Supply and Flexibility:
- One advantage of the NE5532 is that it can handle a slightly wider range of power supply voltages. This can be helpful if your setup isn’t always perfect or if conditions are a bit rougher.
- But realistically, the OPA2134PA easily covers the standard ±15 V that’s common in most audio gear, so it’s flexible enough for typical use.
- Cost and Availability:
- The NE5532 is definitely easier on the budget and usually simpler to find, especially if you’re producing in bulk or working on budget-sensitive projects.
- However, if you’re targeting high-end audio performance, spending a bit extra for the OPA2134PA is usually worth it.
Conclusion and Recommendation:
If your project is all about keeping costs low and you want something widely available, then stick with the NE5532—it’s tried-and-true. But if you’re going for top-notch sound quality, super low distortion, and that audiophile-grade experience, the OPA2134PA is a clear winner.
Just remember to test whichever amplifier you choose in your actual setup to make sure it meets your expectations.
OPA2134PA DIY Audio Applications
1. CMoy Headphone Amplifier
The CMoy amp is a neat little headphone amplifier that’s powered by batteries. If you’re just starting out with DIY audio projects, it’s perfect for you. A lot of folks choose the OPA2134PA chip because it’s easy to use and gives great sound quality. Plus, it’s super portable, so you can take it anywhere. If you need a hand building it, there are tons of easy-to-follow guides on sites like Instructables. They’ll walk you through each step, making sure you get it right the first time.
2. Grado RA1 Clone
This project helps you build your own version of the Grado RA1 headphone amplifier. You’ll use the OPA2134PA chip, which gives your audio a warm, rich, and detailed sound. If you’re into DIY and want to enjoy some seriously high-quality music, this amplifier is definitely one you’ll want to check out. It’s popular among DIYers who appreciate great sound without breaking the bank.
3. Portable Headphone Amplifier with BUF634 Buffer
If you’re aiming for even better sound quality, you might want to try pairing the OPA2134PA with a BUF634 buffer in your portable headphone amplifier build. Doing this will boost the amplifier’s current output, letting you drive a bigger variety of headphones—especially those that need a bit more power. It’s a pretty common trick among audio DIYers, and it’ll help your amp perform at its best.
4. DIY Op-Amp Based Preamplifier
If you’re thinking about building your own preamplifier, the OPA2134PA is a fantastic choice. It’s great at keeping noise and distortion super low, which means you’ll get crystal-clear, accurate sound for your line-level audio signals. This makes your music or recordings sound clean and professional. It’s exactly why a lot of DIY audio folks love using this chip in their preamp projects.
More Like This

74HCT280D,653
NXP USA Inc.

74HCT280N,652
NXP USA Inc.
N74F280BN,602
NXP USA Inc.

1621B2UZZGR
Texas Instruments
1621B1UZZGR
Texas Instruments

SN74S280NSRG4
Texas Instruments

SN74LS280DRG4
Texas Instruments
SN74AS286NSRG4
Texas Instruments
SN74AS286DRG4
Texas Instruments
SN74AS280DRG4
Texas Instruments
SN74ALS280DRG4
Texas Instruments
SN74ALS280DG4
Texas Instruments
Also Add to Cart

M25P128-VME6TGB
Micron

LTC6906CS6
Analog Devices

LM5177DCPR
Texas Instruments

JS28F640J3F75G
Micron Technology Inc.
OP295GSZ-REEL7
Analog Devices Inc.
PIC16F15355T-I/SS
Microchip Technology
LT1796IS8
Analog Devices

74HCU04D
Toshiba Semiconductor and Storage
LRB521CS-30T5G
onsemi

2ED020I12FIXUMA1
Infineon Technologies

ADS1198CPAG
Texas Instruments
LM5050MK-1
Texas Instruments
Related Products
74HCT280D,653
NXP USA Inc.
74HCT280N,652
NXP USA Inc.
N74F280BN,602
NXP USA Inc.
1621B2UZZGR
Texas Instruments
1621B1UZZGR
Texas Instruments
SN74S280NSRG4
Texas Instruments
SN74LS280DRG4
Texas Instruments
SN74AS286NSRG4
Texas Instruments
SN74AS286DRG4
Texas Instruments
SN74AS280DRG4
Texas Instruments
SN74ALS280DRG4
Texas Instruments
SN74ALS280DG4
Texas Instruments

CY74FCT480BTSOCTG4
Texas Instruments
CD74AC280M96G4
Texas Instruments
74ACT11286NG4
Texas Instruments
74ACT11286N
Texas Instruments

SY10E193JZ TR
Microchip Technology
SY10E193JZ
Microchip Technology
SY10E160JZ TR
Microchip Technology
SY10E160JZ
Microchip Technology
SY100S360JZ-TR
Microchip Technology
SY100S360JZ
Microchip Technology
SY100E193JZ TR
Microchip Technology
SY100E193JZ
Microchip Technology
SY100E160JZ TR
Microchip Technology
SY100E160JZ
Microchip Technology
SN74S280NSRE4
Texas Instruments
SN74S280NSR
Texas Instruments
SN74LS280DRE4
Texas Instruments
SN74LS280DR
Texas Instruments
Please send RFQ , we will respond immediately.
