
MAX232ID Datasheet, Price, PDF
- Type: Transceiver
- Protocol: RS232
- Number of Drivers/Receivers: 2/2
- Package: 16-SOIC (0.154, 3.90mm Width)


FREE delivery for orders over HK$250.00

Quick response, quick quotaton

Flash shipment,no worries after sales

Original channel,guarantee of the authentic products
0936 FT232RL USB to Serial adapter module USB TO RS232 Max232 for Arduino download
Max232id
If you’re working on interfacing microcontrollers or embedded devices with PCs, the MAX232ID from Texas Instruments is a handy RS-232 transceiver you’ll want to consider. It runs off a simple +5V power supply—no need for those extra ±12V rails. Thanks to its built-in charge pump, it automatically generates the necessary ±10V signals required for RS-232 communication.
It’s ideal for general serial communication with a decent data transfer rate up to 120 kbps. Plus, it comes with strong built-in ESD protection (up to ±15kV), making your circuit more reliable.
The MAX232ID packs two RS-232 drivers and two receivers into a compact SOIC-16 package, simplifying your PCB layout. With low power consumption and wide operating temperature (-40°C to +85°C), it’s perfect for industrial controls, embedded systems, modems, and data-acquisition projects.
Max232id Pinout Connection

| Pin Number | Pin Name | Description |
|---|---|---|
| 1 | C1+ | External capacitor C1 positive terminal |
| 2 | VS+ | Positive voltage output (charge pump) |
| 3 | C1- | External capacitor C1 negative terminal |
| 4 | C2+ | External capacitor C2 positive terminal |
| 5 | C2- | External capacitor C2 negative terminal |
| 6 | VS- | Negative voltage output (charge pump) |
| 7 | T2OUT | RS-232 Transmitter Channel 2 Output (to external device) |
| 8 | R2IN | RS-232 Receiver Channel 2 Input (from external device) |
| 9 | R2OUT | Receiver Channel 2 Output (TTL logic level) |
| 10 | T2IN | Transmitter Channel 2 Input (TTL logic level) |
| 11 | T1IN | Transmitter Channel 1 Input (TTL logic level) |
| 12 | R1OUT | Receiver Channel 1 Output (TTL logic level) |
| 13 | R1IN | RS-232 Receiver Channel 1 Input (from external device) |
| 14 | T1OUT | RS-232 Transmitter Channel 1 Output (to external device) |
| 15 | GND | Chip Ground |
| 16 | VCC | +5V power input |
When you’re setting up the MAX232ID, here are some tips you’ll want to follow. First, ensure the VCC pin (pin 16) has a stable 5V supply and ground pin (pin 15) is securely grounded.
Connect external capacitors carefully—use 1μF capacitors for pins 1 & 3 (C1) and pins 4 & 5 (C2). Also, don’t forget pins 2 (VS+) and 6 (VS-) need their own 1μF capacitors. Place these capacitors close to the chip to keep everything stable and reduce unwanted interference.
For RS-232 connections, link the T1OUT and T2OUT pins directly to your RS-232 device’s input, and connect R1IN and R2IN pins to its output. The TTL pins (T1IN, T2IN, R1OUT, R2OUT) connect directly to your microcontroller or other logic circuits using standard 0-5V signals.
Finally, although the MAX232ID includes strong internal ESD protection (±15kV), adding external protection like TVS diodes at your RS-232 connectors can further enhance reliability.
Max232id Equivalent Uart Converter

| Parameter | MAX232ID | MAX3232ID | SP232EEN-L | ADM232AARNZ |
|---|---|---|---|---|
| Manufacturer | TI (Texas Instruments) | TI (Texas Instruments) | MaxLinear | Analog Devices |
| Package Type | SOIC-16 | SOIC-16 | SOIC-16 | SOIC-16 |
| Supply Voltage Range | 4.5~5.5V | 3.0~5.5V | 4.5~5.5V | 4.5~5.5V |
| Maximum Data Rate | 120 kbps | 250 kbps | 120 kbps | 120 kbps |
| ESD Protection Level | ±2kV | ±15kV | ±15kV | ±15kV |
| External Capacitor Requirement | 1µF | 0.1µF | 1µF | 1µF |
| Features | Standard variant | 3.3V compatibility, high-speed communication | High ESD protection | Low-power design, suitable for battery-powered applications |
When picking an alternative to the MAX232ID, make sure it fits your system’s voltage needs. For modern designs that run on lower voltages, something like the MAX3232ID, which operates at 3.3V, might be better.
If your communication needs higher speeds, look at chips like the MAX3232ID—it supports faster rates up to 250 kbps. Also, consider your environment: for industrial setups or places prone to static electricity, pick models with strong ESD protection (±15kV), such as the MAX3232ID, SP232EEN-L, or ADM232AARNZ.
Another tip: the MAX3232ID lets you use smaller external capacitors (0.1μF), which can be handy when you’re tight on PCB space.
Max232id Rs232 Circuit Schematic

When you’re setting up the MAX232ID chip, remember it just needs a single 5V supply, no extra ±12V needed. Connect capacitors (1µF ceramic or tantalum) close to the pins 1 & 3 and 4 & 5 to help the internal charge pump create the ±8.5V needed for RS-232 levels.
Your microcontroller or logic circuit inputs data through pins 11 and 10, and receives data back through pins 12 and 9. These signals are converted to proper RS-232 voltages on pins 14 and 7 (outputs) and pins 13 and 8 (inputs).
Keep your capacitors as close to the chip as possible to minimize noise, and route your RS-232 lines away from noisy or high-power traces to keep signals clean. Even though the chip has internal ESD protection, adding extra external protection at the RS-232 connector is always a good idea for reliability.
Max232id Serial Communication Circuit
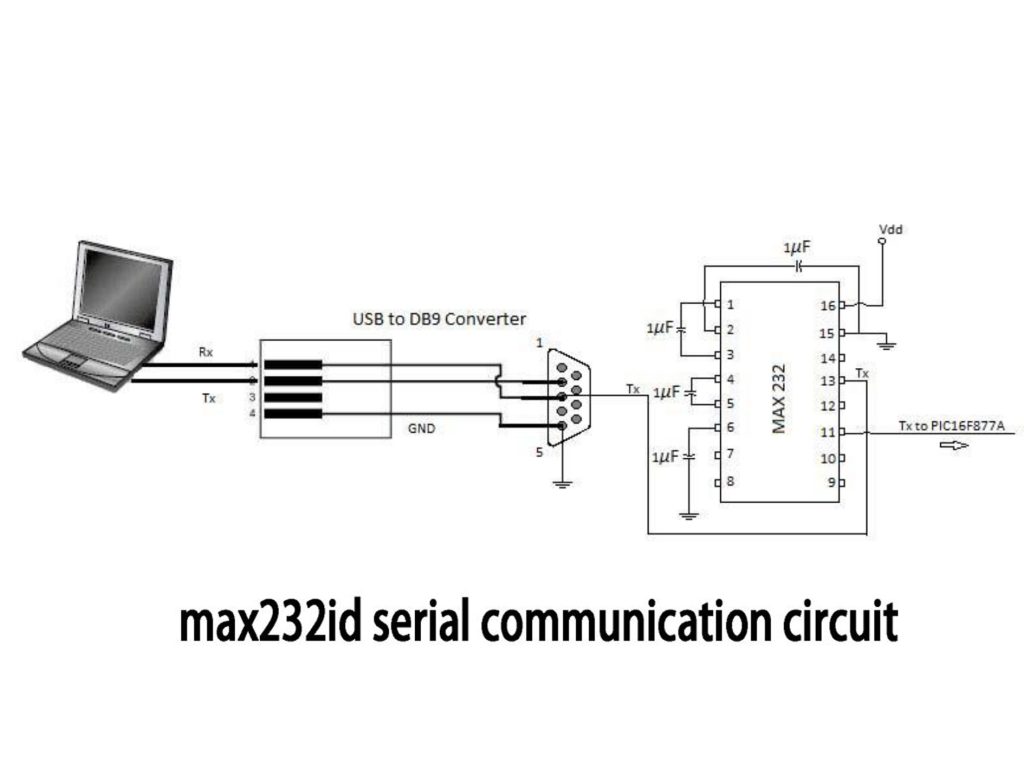
When you’re connecting your microcontroller, like a PIC16F877A, to a computer through an RS-232 interface, the MAX232 chip is your best friend. It easily converts between TTL and RS-232 signals using just a single +5V supply and a few external capacitors (usually 1μF ceramic or tantalum types).
Your DB9 connector’s pins 2 and 3 must cross-connect with the MAX232—pin 2 (RX) to the MAX232’s TX output, and pin 3 (TX) to its RX input. Don’t forget pin 5 on the DB9, which goes to ground.
Place capacitors close to the MAX232 to keep signals clean. Make sure your ground connections are solid and stable, linking DB9 ground (pin 5) clearly with the MAX232 ground. Also, double-check that your microcontroller’s logic level matches the TTL side of the MAX232—typically 5V for compatibility.
Max232id Arduino Uart Interface
If you’re trying to set up serial communication between your Arduino and an RS-232 device, using the MAX232ID chip is a great way to go. Here’s how to connect everything easily:
Hook your Arduino’s TX pin to pin 11 (T1IN) on the MAX232ID, and the RX pin to pin 12 (R1OUT). Provide a common ground between your Arduino and the MAX232ID (pin 15). Connect Arduino’s 5V power to pin 16 on the MAX232ID. You’ll need four 1µF capacitors around the MAX232ID to generate proper RS-232 voltages.
Connect the MAX232ID output pins (14 and 13) to the DB9 serial port pins 2 (RX) and 3 (TX), respectively. Ensure DB9 pin 5 is grounded for reliable communication.
Make sure your Arduino and RS-232 device share the same baud rate, like 9600bps. Now you’re ready to communicate smoothly with PCs, PLCs, and other industrial devices!
More Like This

DC-ME4-01T-JT
Digi
DC-ME-01T-JT
Digi

FS-355
Digi

DC-ME-01T-S
Digi

FS-662
Digi

FS-362
Digi

FS-365
Digi
FS-373
Digi

FS-377
Digi
FS-383
Digi

FS-353
Digi

DC-EM-02T-C
Digi
Also Add to Cart

WM8524CGEDT/R
Cirrus Logic Inc.
PCT1075TP,147
NXP USA Inc.

ATF16V8BQ-10SC
Microchip Technology

PIC16F747-I/PT
Microchip Technology

ISD4002-180EIR
Nuvoton Technology Corporation
.jpg "NCP4308DMTTWG")
NCP4308DMTTWG
onsemi

SN74AS286NSRG4
Texas Instruments

N74F85N,602
NXP USA Inc.

MIC29302AWD
Microchip Technology

OPA2209AIDGKR
Texas Instruments

ISL12022IBZ
Renesas Electronics America Inc
24LC64T-I/OT
Microchip Technology
Related Products
DC-ME4-01T-JT
Digi
DC-ME-01T-JT
Digi
FS-355
Digi
DC-ME-01T-S
Digi
FS-662
Digi
FS-362
Digi
FS-365
Digi
FS-373
Digi
FS-377
Digi
FS-383
Digi
FS-353
Digi
DC-EM-02T-C
Digi
DC-EM-02T-S
Digi

DC-SP-01-C
Digi

DC-ME4-01T-C-10
Digi
DC-ME-01T-C-10
Digi
DC-ME-01T-S-10
Digi

DC-SP-01-JT
Digi
DC-EM-02T-JT
Digi

101-0950
Digi
101-0949
Digi
101-0497
Digi
101-0675
Digi
101-0674
Digi
101-0673
Digi
101-0672
Digi
101-0698
Digi

101-0691
Digi
101-0562
Digi
101-0561
Digi
Please send RFQ , we will respond immediately.
