
CPC1117N datasheet & circuit | pdf
- Circuit: SPST-NC (1 Form B)
- Output Type: AC, DC
- Termination Style: Gull Wing
- Package: 4-SOP (0.150", 3.81mm)


FREE delivery for orders over HK$250.00

Quick response, quick quotaton

Flash shipment,no worries after sales

Original channel,guarantee of the authentic products
CPC1117N
If you’re looking into the CPC1117N relay for your next project, here’s why it’s such a great choice. First off, it’s optically isolated, so you’ll get clean signal transmission without interference issues. Plus, it has really low on-resistance, meaning your signals pass through with minimal loss. Another great thing is its compact size—it comes in a tiny 4-pin SOP package, perfect when PCB space is tight.
You’ll also appreciate its low power consumption, helping you keep your project’s energy usage down. And for safety, it provides high isolation voltage between input and output—definitely something you’ll want in industrial or medical gear. Since it’s a solid-state relay, there are no mechanical parts to wear out, giving you quiet operation and a longer lifespan. And lastly, its fast switching speed makes it ideal for precise control and high-frequency applications. You’ll commonly see it used in things like industrial automation, telecom systems, medical equipment, and data acquisition setup
cpc1117n pinout & cpc1117n smd optocoupler ic
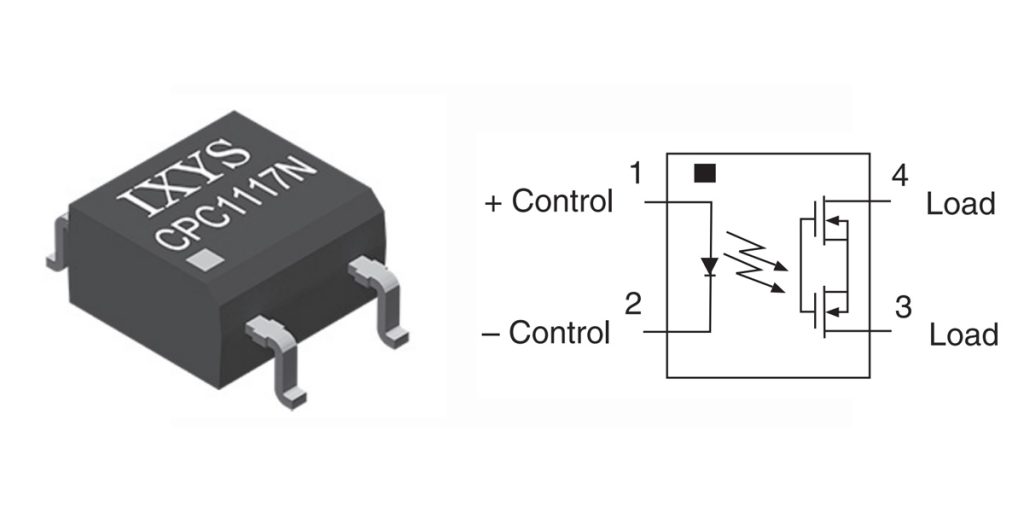
Here’s the CPC1117N pinout presented clearly in a table:
| Pin Number | Pin Name | Description |
| 1 | LED+ (Anode) | LED Anode (positive input terminal) |
| 2 | LED- (Cathode) | LED Cathode (negative input terminal) |
| 3 | MOSFET Drain | MOSFET output (Drain), output switching control |
| 4 | MOSFET Drain | MOSFET output (Drain), output switching control |
When you’re working with the CPC1117N relay, here’s a simple tip: connect pins 1 and 2 to your control signal, but don’t forget to use a resistor to limit current. This helps keep the internal LED safe. When you do this, the relay activates its optical isolation, turning on the MOSFET inside. Pins 3 and 4 then become your output points—just hook them up directly to the load you’re controlling. But make sure your load doesn’t exceed the relay’s rated voltage and current; otherwise, you might damage it. And for the best long-term performance, take some extra time to lay out your PCB carefully and keep an eye on heat dissipation.
cpc1117n equivalent relay


| Parameter | CPC1117N | CPC1117NTR | AG70S | AQY412S |
| Manufacturer | Littelfuse | Littelfuse | Bright Toward | Panasonic |
| Contact Type | SPST-NC (1 Form B) | SPST-NC (1 Form B) | SPST-NC (1 Form B) | SPST-NC (1 Form B) |
| Load Voltage (V) | 60 | 60 | 60 | 60 |
| Load Current (mA) | 150 | 150 | 400 | 400 |
| On-Resistance (Ω) | 16 | 16 | 0.75 | 2 |
| Input Control Current (mA) | 1 | 1 | Not Specified | 3 |
| Isolation Voltage (Vrms) | 1500 | 1500 | 3750 / 5000 | 3750 |
| Package Type | SOP-4 | SOP-4 (Tape & Reel) | SOP-4 | SOP-4 |
| Notes | Original reference model | Tape & Reel packaging of CPC1117N | Lower on-resistance, higher current capacity | Higher input current; confirm control compatibility |
When you’re looking for a replacement relay, there are a few important points you should keep in mind. First off, always check if the relay you’re picking can handle the same voltage, current, and on-resistance as your original part—that way it fits your application exactly. Also, double-check the input current of your replacement relay so you can be sure your control circuit drives it without issues.
Don’t overlook the physical stuff either; make sure the new relay’s pin layout and size match your PCB design. And if you’re dealing with special requirements—like extra-high isolation voltage—take a close look at those specs too.
Finally, always confirm the details in the official datasheet before making your final choice. That’ll help make sure your relay fits your needs perfectly.
cpc1117n opto relay circuit example
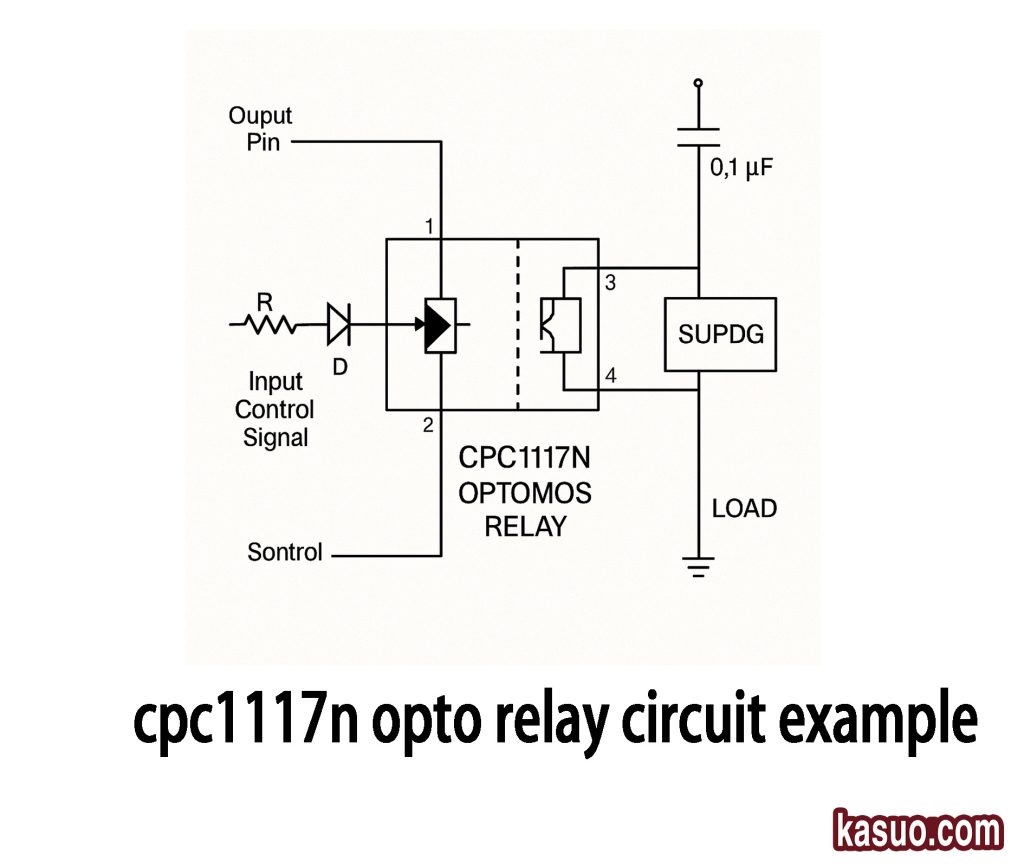
When you apply a control signal to the relay’s input side, it lights up an internal LED. This LED then triggers a MOSFET switch on the output side, turning your load circuit either on or off. This setup effectively isolates your control signal from the load.
The big benefit here is that your input and output stay electrically separated, so you avoid noise and interference. Plus, this solid-state relay responds quickly, works reliably, and runs quietly without any mechanical clicks. It’s perfect for sensitive gear like precision instruments, automation equipment, or data acquisition systems—where you need clean, dependable isolation control.
cpc1117n arduino switching wiring & solid state relay schematic

Here’s a quick way you can set up your Arduino with a CPC1117N relay for safe, isolated control:
Start by connecting Arduino’s digital pin 7 through a resistor to the relay’s input LED, limiting current to protect the relay. Then, connect Arduino’s GND pin directly to the relay’s negative input to complete the control circuit.
Inside the relay, when your Arduino outputs a HIGH signal, the internal LED turns on, activating the built-in MOSFET via optical isolation. This closes the relay, powering your connected load. For the load, simply connect one side to a 12V source, the other to your relay output, and loop back to negative to form a complete circuit. Don’t forget a 0.1µF capacitor across the supply to stabilize power.
When Arduino pin 7 goes HIGH, your load switches on; when LOW, it turns off. Simple, clean, and reliable—perfect for automation and instrumentation projects.
cpc1117n control ac load with dc input

If you want to safely control an AC load using a DC input signal, the CPC1117N relay is a simple and effective solution. Your DC control signal turns on the relay’s internal LED (remember a resistor!), triggering the optically isolated MOSFET. This isolation prevents any electrical interference between input and output. Pins 3 and 4 then connect your AC load, letting it power on or off quickly and quietly. It’s compact, reliable, and ideal for automation, appliance control, or precise instruments where safety and isolation matter most.
cpc1117n application in automation
If you’re setting up automated equipment, here’s where relay modules like the CPC1117N really shine. You can use them to safely link your PLCs with external sensors and devices, keeping signals clean and preventing electrical interference. They’re great for smoothly controlling small motors and actuators in production lines without noisy switching. They also protect your sensitive electronics by isolating sensor signals, keeping voltage spikes at bay. Plus, for remote systems, they offer safe control over high-voltage equipment. Even your data acquisition gets safer and more accurate thanks to their precise switching and reliable isolation.
More Like This
Also Add to Cart

PF240D25
Sensata-Crydom

AQY221N2V
Panasonic Industrial Devices

CPC1330GRTR
Littelfuse Inc.

G3VM-61FR1
Omron Electronics Inc-EMC Div

G3VM-61D1
Omron Electronics Inc-EMC Div

AQW214EH
Panasonic Electric Works
CPC1017N
Littelfuse Inc.

LBA716STR
Littelfuse Inc.

AQY282S
Panasonic Electric Works
CPC1035N
Littelfuse Inc.
CPC1117N
Littelfuse Inc.
AQY212SX
Panasonic Electric Works
Related Products

VO1400AEF
Vishay Semiconductors
AQY221N2V
Panasonic Industrial Devices
TLP172AM
Toshiba
TLP172GM
Toshiba
TLP3123
Toshiba
TLP175A
Toshiba
TLP240A
Toshiba
TLP3122
Toshiba
TLP3341
Toshiba

KAQY212STLD
Cosmo Electronics

KAQY214S
Cosmo Electronics

KAQY212S
Cosmo Electronics

KAQY214STLD
Cosmo Electronics

AQV258HAXC88
Panasonic

ASSR-1510-003E
Broadcom Limited
AQY210EHAX
Panasonic Electric Works
AQY212GHAX
Panasonic Electric Works

PVX6012PBF
Infineon Technologies
LBA716S
Littelfuse Inc.
CPC1330GRTR
Littelfuse Inc.
LAA127S
Littelfuse Inc.
CPC1114NTR
Littelfuse Inc.

AQW212EHA
Panasonic Electric Works

PVG612AS-TPBF
Infineon Technologies

AQS225R2S
Panasonic Electric Works
AQS221FR2S
Panasonic Electric Works
CPC1106NTR
Littelfuse Inc.

G3VM-61VY2
Omron Electronics Inc-EMC Div

G3VM-355FR
Omron Electronics Inc-EMC Div
CPC1025NTR
Littelfuse Inc.
Please send RFQ , we will respond immediately.
