How to Put a Timer on a Light Switch?
Author:admin Date: 2025-01-23 03:14 Views:176
With the accelerated pace of life and the popularization of automation technology, light switch timer has become a popular device for smart home. It not only makes life more convenient, but also effectively saves energy and improves the comfort and safety of living.
What is a Light Switch Timer?
The Light Switch Timer is a device that automatically controls the switching of lights. It can either be installed directly on an existing wall switch or used as a stand-alone device. The basic principle is that by setting the time, the timer automatically controls the power on or off, realizing lighting automation. With the timer, you can enjoy the convenience of automation without having to manually switch the lights on and off every day.
Why choose a Light Switch Timers?
1. Save electricity bill: We often forget to turn off the lights due to negligence, resulting in a waste of electricity. The timer can automatically turn off the lights to avoid this situation and help you save electricity and energy.
2. Automatic control: The timer can automatically control the lights on and off according to your life needs. For example, it will automatically turn on at dusk and turn off at dawn, or turn off at night when you go to sleep, eliminating the need to manually operate them every day.
3. Improve security: the timer can also simulate someone at home when you go out, by automatically controlling the light switch changes, giving neighbors the illusion that someone is at home, thus reducing the risk of theft and enhancing the sense of family security.
4. Create a festive atmosphere: During the holiday season, especially Christmas and New Year, the timer can help you automatically switch the lights, easily create a festive atmosphere, adding warmth and surprise. Whether for family gatherings or festive decorations, the timer is a good helper to enhance the sense of festivity in the home.
5. Variety of choices: After understanding the advantages of light switch timers, you may wonder what choices are available on the market. Different types of timers are available to meet a variety of home needs, from simple mechanical timers to powerful smart Wi-Fi timers.
Types of Light Switch Timers
Mechanical Light Switch Timer
This classic mechanical timer works through gears and springs and requires no batteries. By manually adjusting a dial or pin to set the time, the timer automatically triggers the switch at a predetermined time, making it suitable for basic lighting controls that do not require high precision or complex features. Simple to operate and inexpensive.
Countdown Light Switch Timer
This timer allows you to set a specific run time (such as 5 minutes or 1 hour). When the time is up, the lights automatically turn off, making it convenient and energy efficient for devices that are used for short periods of time, such as bathroom exhaust fans or garage lights.
Programmable Digital Light Switch Timer
Programmable digital timer with LCD screen provides minute-by-minute accuracy and supports multiple time periods, daily or recurring schedules with flexible programming capabilities. Ideal for complex lighting setups, individual lighting schedules can be customized for different rooms or occasions.
Indoor Light Timer Switch
Designed for indoor lighting, it allows a fixed schedule to be set to effectively manage the lighting in your living room, bedroom or workspace. By rationally scheduling lights on and off, it not only enhances home comfort but also reduces energy consumption.
Outdoor Light Timer Switch
Designed for outdoor use, they are waterproof, dustproof and resistant to inclement weather. Many models feature light sensors that automatically control lights based on light changes, turning lights on at dusk and off at dawn for security, porch and street lights. Compatible with a wide range of bulbs, including incandescent, halogen, fluorescent and LED bulbs.
Wireless and Smart Light Switch Timers
Can be controlled remotely via mobile app or voice assistants (such as Amazon Alexa and Google Assistant), and easily set up timed schedules. No complicated wiring is required and it can be linked with other smart devices to provide a convenient and energy-saving smart lighting experience.
Dual Light Switch with Timer
This timer can control the switching time of two light sources at the same time, such as the main light and the decorative light, which makes it easy to adjust different light sources separately. Commonly used in scenes that require multiple light sources to be switched, such as the main light and background light settings of a home theater.
How to put a timer on a light switch?
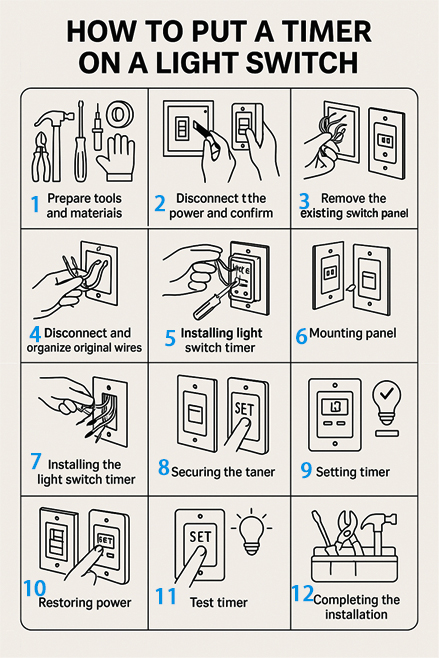
NOTE: Installation methods may vary for different types of timers, please follow the instructions provided by the manufacturer. If you are not familiar with electrical installation, it is recommended to ask a professional electrician to help with the installation.
1. Prepare tools and materials
Including light switch timer, screwdriver, wire stripping tool, voltage tester, electrical tape, electrician’s gloves.
2. Disconnect the power and confirm
Before starting the installation, be sure to disconnect the power from the corresponding circuit breaker in the distribution box. Use a voltage tester to confirm that the wires are disconnected. If the power is still on, recheck the distribution box to make sure the power is completely off.
3. Remove the existing switch panel
Use a screwdriver to remove the fixing screws of the existing switch panel, remove the panel and expose the terminals.
Suggestion: When removing the original wiring, take photos or record the wiring pattern for easy reference during subsequent installations.
4. Identifying live wires
Use a voltage tester to confirm the exact location of the Fire and Zero wires to avoid accidentally touching live wires.
Mark the fire wire: The fire wire is usually red or black, mark it with electrical tape to avoid confusion during installation.
5. Disconnect and organize the original wires
After the power is completely disconnected, carefully remove the wires and remember how the Fire and Zero wires are connected. Organize the wires neatly and fix the wires with electrical tape to avoid the exposed parts touching the metal parts or short-circuiting.
6. Installing the light switch timer
Before installation, check the wiring diagram in the timer’s instruction manual to confirm the timer’s rated voltage, power and wiring to make sure it matches the existing circuit.
Wiring:
– Connect the timer’s fire wire terminal (usually red or black) to the fire wire terminal in the electrical box.
– Connect the timer’sneutral terminal (usually white) to the neutral terminal in the electrical box.
– If the timer has a ground terminal (green or green-yellow striped), connect the ground wire to the ground terminal in the electrical box; if there is no ground terminal and the power supply has a grounding requirement, you still need to connect the ground wire.
Use a screwdriver to tighten the terminals to prevent loose wires.
7. Securing the timer
Install and secure the timer into the electrical box, making sure that the wires are not pulled or pressed to avoid damage to the wires. Organize the wires and secure them in place with electrical tape or cable retainers to avoid interfering with the normal operation of the timer.
8. Mounting the panel
Mount the timer panel to the wall and secure with screws. If the timer has an external protective cover, make sure it is in place to prevent dust and moisture from entering.
9. Restoring Power
Turn on the power in the distribution box and reconnect the circuit. Use a voltage tester to reconfirm that the wiring is correct and ensure that the power supply is smooth and the current is stable.
10. Setting the timer
Set the timer according to the timer manual, set the switching time, mode and other functions (such as countdown, cycle, etc.).
When operating, make sure each setting is accurate, especially if the timer has multiple functions.
11. Test timer
– Function Test: Test the timer to see if it can automatically turn on and off the lights or other devices according to the preset time and check the accuracy.
– Temperature Test: During the test, pay attention to whether the timer is abnormally hot. If there is any abnormality, cut off the power immediately and check if the wiring is correct or if there is any short circuit.
12. Completing the Installation
If the timer works normally and does not generate abnormal heat, the installation is complete.
Finally, pack up the tools and make sure there are no exposed wires or loose screws around to ensure safety.
How to Program a Light Switch Timer?
Different types of timers (mechanical, digital, smart, wall timers) are programmed differently.
Mechanical timer (knob type)
Suitable for on/off control at the same time every day:
1. Setting the current time: turn the dial clockwise to align the pointer with the current time.
2. Setting the on/off time: Press (or pull up) the buttons around the dial, each button represents 15-30 minutes. For example, to turn the lights on at 7 PM and off at 6 AM, press the button between 7 PM – 6 AM.
3. Connect to power: Plug the timer into the outlet, plug the fixture into the timer, and select “AUTO” mode.
Digital timer (LCD screen + keys)
Suitable for precise control or multiple time periods:
1. Setting the current time: Press and hold the “CLOCK” key to adjust the time using “HOUR”, “MIN”, “WEEK”. Press and hold “CLOCK” key, use “HOUR”, “MIN”, “WEEK” to adjust the time.
2. Setting the switching time: Press “PROG” key to input the time of turning on the light, press “PROG” key again to input the time of turning off the light. You can repeat the operation to add more than one group of timing.
3. Start the timer function: Press “ON/AUTO/OFF” to switch to “AUTO” mode, and connect the power supply.
Intelligent Timer (Wi-Fi/App Control)
Suitable for remote control, voice command, smart scene:
1. Download App (e.g. Smart Life, Tuya, etc.), install and register account.
2. Pair the device: Connect the device to Wi-Fi as directed by the App.
3. Set timed tasks: Find the “Timing” or “Automation” function in the App, set the on/off time, and select functions such as repeat mode, brightness adjustment, etc. The device needs to maintain stable Wi-Fi. You need to keep a stable Wi-Fi connection, otherwise the timing may not work.
Wall Switch Timer (Built-in)
Suitable for directly replacing traditional switches to realize automatic control:
1. Mechanical wall timer: Rotate the dial to set the current time, adjust the dial to set the switching time, and select “T (Timer)” mode to run.
2. Digital Wall Timer: Press “Hour/Minute/Day” to set the current time, press “PROG” to add a timer task, and select “AUTO” mode.
Choose the suitable timer and follow the steps to set it, you can easily realize the timer to turn on and off the light.